

A good Petri dish design is essential for plant and fungal development, to enable observations, and ultimately for a culture management that is not too time-consuming.
The instructions below differ slightly from the original publication in the Symbiosis or JOVE journals, as they include improvements and observations made after the publication. The content nevertheless remains valid.
Menu
- General manufacturing principles
- Basic materials
- Making the lid
- Preparing the Petri dish base
- Attaching the Nitex membrane
- Assembling the Petri dishes
- Step-by-step planning and manufacturing guide
- Links to the formal publications
General manufacturing principles:
Two-compartment Petri dishes are used to offer the plant and the fungus two different, complementary environments:
- The vermiculite compartment resembles the natural environment. Vermiculite does not hold much water and is opaque to the observer
- The polymer compartment is compatible with roots and hyphae. It provides a reserve of water and nutrients, and its good transparency allows the symbiosis to be observed live.
- The two compartments are separated by a membrane so that roots do not invade the polymer compartment. Too many roots hinder observation.
- The plant and foliage require light, while the roots must be kept in darkness
- The materials and tools must be clean, even though sterility is not required.
Basic materials:

90 mm two-compartment Petri dish and Nitex membrane (or equivalent). Plantago lanceolata roots easily pass through mesh larger than 60 µm, so I use 35 µm or less.

Wood-burning tool with a 50 mm cutting guide and a paper clip (see the “Heat fixation” video below).
To cut the Petri dish plastic, a rotary tool such as a “Dremel” is used. Here I use Dremel bits no. 199, 194, and 116.

UV-curing glue, an applicator with a fine tip, and a powerful ultraviolet lamp.
Making the lid:


Using the rotary tool, drill two holes about 5 to 6 mm wide that will be used for irrigation in each compartment, as well as an opening on the side through which the plant stem will emerge. The same lid will be used for all variants of the Petri dish base described below.
Preparing the Petri dish base
I used three variants of the setup in order to respect the general principles:

Petri dish with a small opening in the central barrier. No Nitex membrane is used. Only a few roots will cross over to the polymer side (in the short term), as well as the hyphae, of course. Very simple to make, but not the best-performing model.

Petri dish with a 40 mm opening in the central barrier, sealed with the Nitex membrane (heat or glue). Very effective even over the long term; hyphae are quickly visible on the polymer side.

A variant of the previous model, with a horizontal slit in the central barrier made with the #199 bit. It is simpler to make than the 40 mm opening and just as effective.

All openings in the Petri dishes are made with a rotary tool that releases no smoke or toxic substances. Gloves prevent fingerprint marks on the Petri dish.
For high-definition imaging
It is possible to make an opening in the floor of the Petri dish and attach a 0.17 mm thick coverslip to it. I make a circular opening 25 mm in diameter and use round coverslips 30 mm in diameter with UV-curing glue. It is important to attach the coverslip under the Petri dish so that the immersion oil can be cleaned off after use. Glass is not very transparent to ultraviolet light, so the coverslips must be cured longer to ensure the glue hardens properly. It must also be ensured that roots cannot get in between the Petri dish and the coverslip by sealing all possible micro-openings with glue.
In the video (link at the bottom of the page), the coverslip is glued with aquarium glue. I later found that once well cured, UV glue holds more firmly and resists roots better.
As the hyphae develop, by geotropism, some will position themselves directly on the coverslip. By inverting the Petri dish on the microscope, high-magnification images can be taken using immersion oil.

Here I marked the edge of the Petri dish opening and the coverslip (before gluing it) with a felt-tip pen to better visualize the elements.

Coverslip glued and firmly in place. Note that the Nitex membrane was not placed here in order to better visualize the assembly.
Attaching the Nitex membrane
The Nitex membrane is always placed on the seedling (vermiculite) side. There are two methods for attaching the membrane: heat fusion and UV-curing glue.
Heat fusion requires a bit more handling than glue, but involves no additional chemical products. It is perfectly stable over the long term.
UV glue is quick and simple to apply, but it introduces additional chemical products into the Petri dish, especially if it is not fully cured. It also carries a risk of coming loose over the long term when submerged in liquid for a very long time.
Heat fixation with the wood-burning tool:
This involves melting and fusing the membrane into the Petri dish plastic with a wood-burning tool. This fusion adds no chemical products to the Petri dish. This method is well described in the Symbiosis publication:
As well as in the following JOVE video, in English, starting at minute 2:50.
https://www.jove.com/v/66848/author-spotlight-enhancing-am-fungi-research-with-sap-as-novel
Here are nonetheless a few illustrations and additional information about the process:
The photo below shows the basic tools: a wood-burning tool with the tip used to melt/fuse the membrane onto the Nitex plastic. The tip must not be sharp or too coarse. A purple paper clip holds the membrane and the cutting guide in place on the central barrier. A piece of Nitex cut larger than the cutting guide and the opening in the barrier. The cutting/fusion guide is simply a thin piece of metal. The rounded corners make it easier to slide the wood-burning tip.

Here is a detailed view of the assembly. The membrane is placed in direct contact with the plastic. The cutting/fusion guide is placed on top of the membrane. The hot wood-burning tool follows the outline of this cutting guide. A paper clip holds the elements in place while the fusion is carried out. The paper clip holds everything in place and clips onto the central barrier behind it. The opening in the central barrier is therefore SMALLER than the cutting guide and the clip.

The heated tip will melt and fuse the Nitex membrane to the Petri dish along the cutting guide, following the red line. The membrane is always placed on the vermiculite side, i.e. the root side. If the membrane is placed on the other side, roots slip in between the membrane and the plastic, grow, and easily cross to the other side. Once the fusion is complete, without removing the clip holding the membrane in place, use tweezers to remove the unnecessary excess membrane. Finally, carefully disassemble everything and it is ready for use.

The final result should look like this. The notch allows a seedling to be placed correctly, the membrane is attached on the root/vermiculite side, and the excess membrane has been removed.

Attaching the membrane with UV glue:
This is now my preferred method, it is quicker and simpler to carry out than heat fixation. Curing time will vary depending on the glue brand and your lamp. In practice, I find it is better to expose the glue to UV light for much longer than the manufacturer indicates, so that the glue withstands water over time. UV glue is not perfect, however, and it occasionally comes loose after long periods of immersion. Furthermore, UV glue may retain a thin unpolymerized film on its surface, even after exposure to UV light. This film could (potentially) exhibit some toxicity to plants or fungi.
Make sure your lamp’s wavelength is compatible with your glue, and that its power and curing time are sufficient. Protect your eyes and skin from UV light.

Cut a piece of Nitex about 14 x 50 mm and make a fold about 4 to 5 mm along its length.

Apply the glue to the shared compartment wall (vertically) and to the base, where the membrane will be glued.

Place the piece of membrane on the glue, positioning the fold in the corner. The 5 mm section goes to the floor.
Click here to find out how to make the fold.

Apply the UV light immediately to firmly hold the membrane in place. The glue must not soak into and seal the vertical section of the Nitex membrane.

Apply a second coat of glue to make sure the membrane is well glued along its entire length and that no root can slip under the membrane. Make sure the glue is properly cured. Glue that is not sufficiently cured tends to come loose due to humidity and water.
Assembling the Petri dishes:
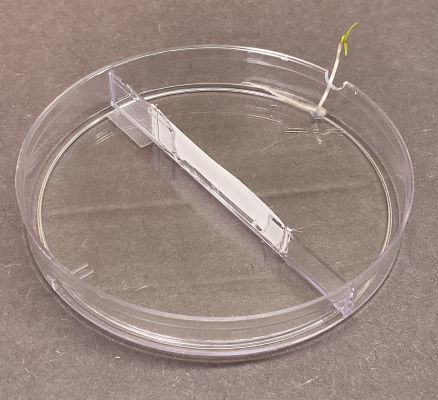
Place a seedling with a rootlet a few cm long. Handling is done using clean fingers or gloved, even though sterility is not maintened,. Tweezers tend to break the fragile seedlings.

I then use fine vermiculite, with grains only a few millimeters in size. A millimeter ruler gives the scale here.

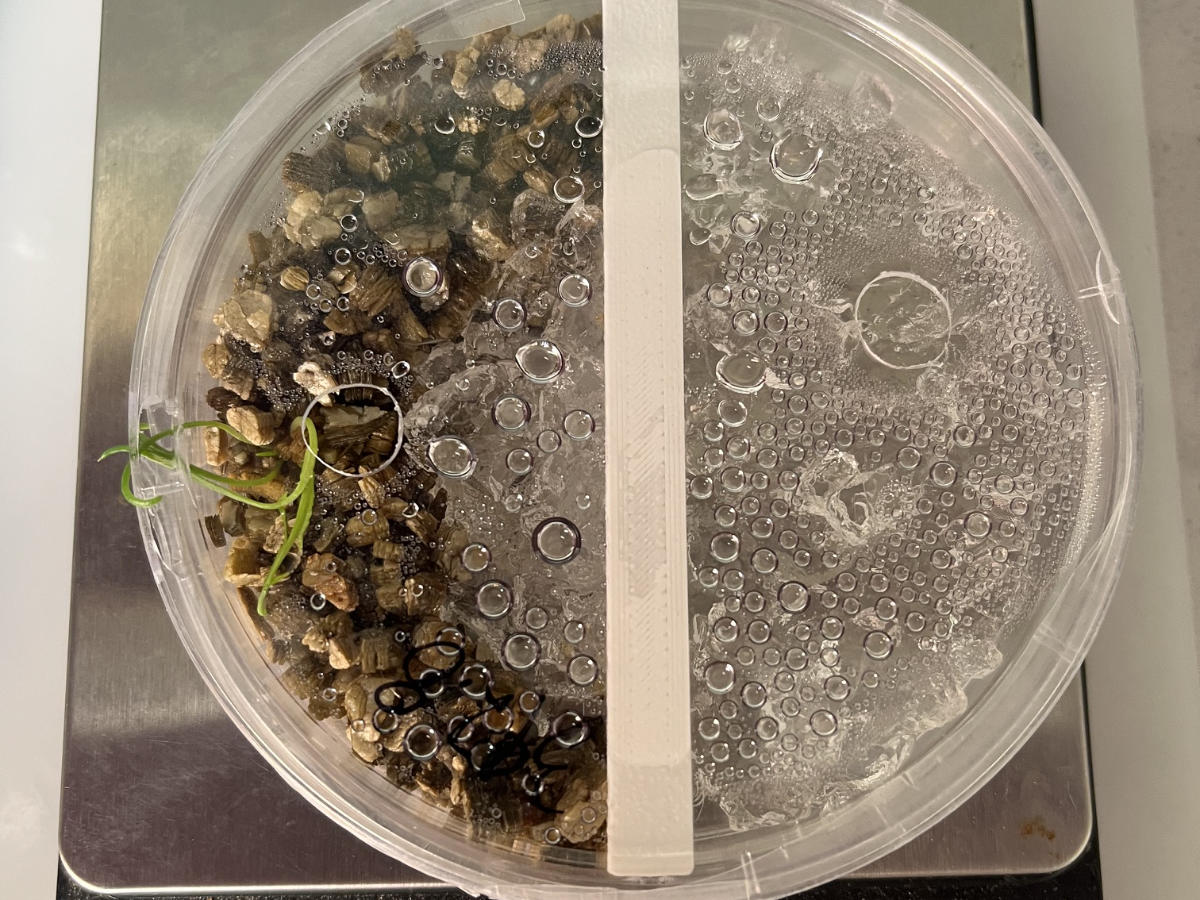
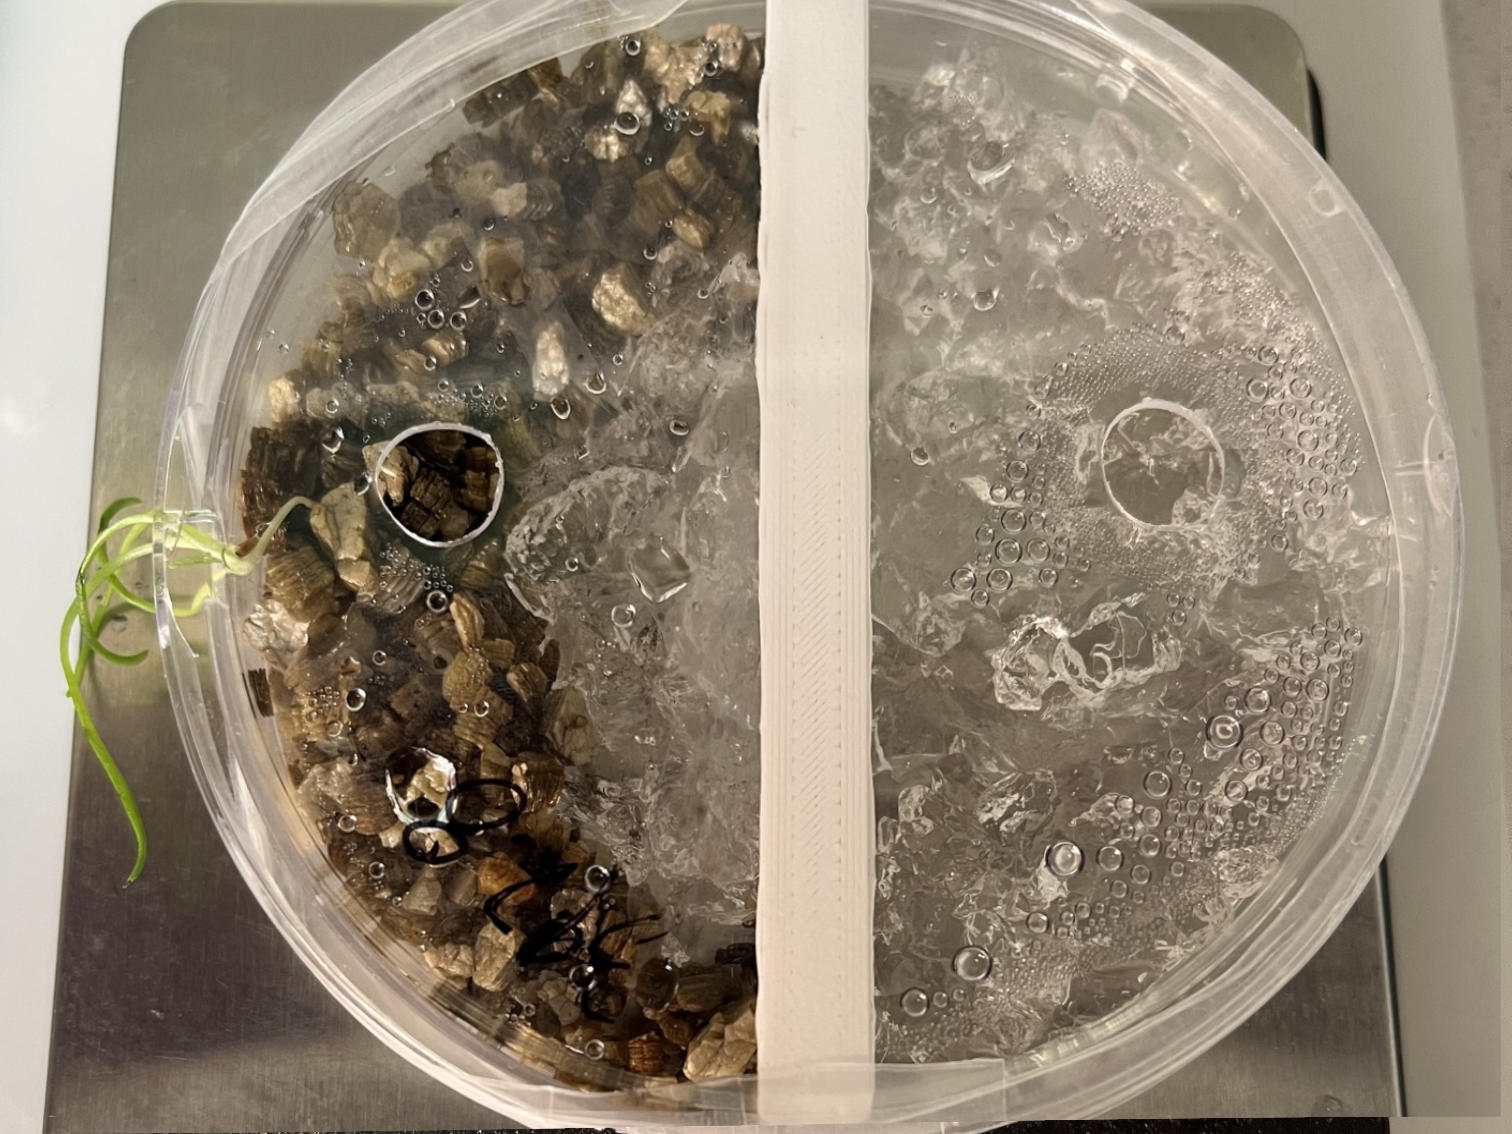
Place about 2 g of vermiculite over the seedling, making sure the stem remains oriented outward. Add about 8 mL of nutrient solution to saturate the vermiculite with liquid.

My preferred variant: Place the vermiculite in a half-circle and about 5 g of polymer in the center. This makes it easier to detect young roots early, as well as hyphae. It also allows detection of hyphae or spores of species that prefer proximity to roots.

Add about 15 g of polymer to the opposite compartment. The polymer must make good contact with the Nitex membrane to facilitate the fungus’s passage into the polymer compartment.

Place the lid and seal it with a strip of parafilm to hold the lid in place. Be careful not to “guillotine” the seedling. Weigh the Petri dish, as the weight will serve as a reference for irrigation.
Assembly with very small seedlings:
Some plants, such as Fragaria vesca or Plantago coronopus, have seedlings so tiny that they cannot be placed at the bottom of the Petri dish. In these cases, the seedlings are placed on well-moistened vermiculite, and a few grains of vermiculite are very delicately placed back over the roots to ensure a moist micro-environment. Don’t hesitate to work under the stereomicroscope for these operations.


Repositioning seedlings:
It sometimes happens that a young seedling develops in the wrong spot, under the lid — don’t hesitate to open the lid and gently reposition it.
Step-by-step planning guide
- Materials
- Gloves
- Ear and eye protection, especially against ultraviolet light if required
- Optional: fume hood for the occasional wisps of smoke
- Two-compartment Petri dishes
- Nitex membrane with 30 µm mesh or smaller
- Felt-tip pen and alcohol for cleaning
- Millimeter ruler
- Metal cutting/welding guides
- Wood-burning tool and suitable tips (at least one)
- Rotary tool and suitable bits (probably three)
- Scissors (for the Nitex membrane)
- Small metal scraper
- UV-curing glue
- Ultraviolet lamp and appropriate protection
- Binocular magnifier (to check the final work)
- Template
- Vacuum or air blower (to clean cutting dust and debris from the Petri dishes)
- Cutting the lids
- Drill the holes in the top of the lid as well as the side opening using the rotary tool ( illustrated here) and the same bit. This step can be done without a template. Align the three openings carefully in a straight line.
- Cut the side opening of the Petri dish. Without changing the bit used for the lids, cut all the openings. The side openings face the central barrier.
- Mark the dimensions for the central openings with a felt-tip pen
- Mark the dimensions for the round opening with a felt-tip pen if you want to glue coverslips for high definition. The round opening is always on the polymer side (opposite the opening) and generally angled relative to the lid opening so as not to irrigate directly above the coverslip. The round opening is marked UNDER the Petri dish, so it can be erased afterward.
- Using the rotary tool, cut the openings in the central barrier.
- Using the rotary tool, cut the round opening in the bottom of the Petri dish.
- Generally, the lines are carved deep enough that they do not need to be erased. If needed, remaining marks can be erased with alcohol.
- Using a small scraper, clean and remove any fused plastic burrs that could interfere with placing the Nitex membrane or the coverslip. This is especially important for coverslips that will be glued underneath the Petri dish.
- Use an air blower to thoroughly clean the Petri dishes.
- Cut the pieces of Nitex membrane using scissors or another tool.
- Make a fold in the membrane (optional), as shown here, to make it easier to position, especially if glue is used.
- Option 1) Attach the Nitex membrane using heat, as shown above.
- Option 2) Attach the membranes with UV glue, as shown above. Note that the ultraviolet wavelength for glues is usually different from the wavelengths used to sterilize equipment. A specific light suited to the glue used is therefore required.
- Glue the coverslips under the Petri dish for high-definition observation, as shown above. The coverslips must be glued underneath the Petri dish so that they can be cleaned. This step is ideally done in several small stages:
- The hole has been drilled
- Apply the UV glue along the hole, forming a closed circle.
- Place the coverslip on the glue, making sure everything is perfectly sealed. Use tweezers to achieve a clean, neat placement.
- Cure the glue with the ultraviolet lamp, while protecting your skin and eyes according to the instructions.
- Turn the Petri dish over and apply a thin bead of glue along the seam so that no micro-opening is left for a root to slip in between the coverslip and the Petri dish, which could cause the root to grow and lift the coverslip. Cure again with UV light for this final bead of glue.
Links to the official publications
The following link leads directly to the video showing how to make a Petri dish using the wood-burning method.
https://www.jove.com/v/66848/author-spotlight-enhancing-am-fungi-research-with-sap-as-novel